How to Use an AI Tattoo Generator: Step-by-Step Guide for 2026
A practical 10-step walkthrough on using an AI tattoo generator in 2026 — from concept to final design ready for your artist.
An AI tattoo generator can take you from "I kind of want a tattoo of a wolf" to a fully visualized, body-tested design in about ten minutes. But getting great results — designs you'd actually commit to permanently — takes a little more than just typing a word into a box and hoping for magic.
This guide walks through exactly how to use an AI tattoo generator in 2026 step by step, from your first vague idea all the way to handing a polished reference to your tattoo artist. By the end, you'll know how to write prompts that work, which styles to pick for which ideas, how to use AR to test placement on your own body, and the small habits that separate "decent AI design" from "tattoo I'll love forever."
What an AI Tattoo Generator Actually Does
Quick refresher before we get into the steps. An AI tattoo generator uses image-generation AI — trained specifically on tattoo artwork — to turn text descriptions and reference photos into custom tattoo designs in seconds. The best ones go further: they let you preview the design on your actual body using augmented reality, generate the same concept in different styles, and refine designs through multiple iterations until you land on the one.
For the deeper background on the tech itself, see our complete AI tattoo generator guide. For now, let's focus on the practical workflow.

Step 1: Get Clear on Your Concept Before You Open the App
The single biggest determinant of how good your AI-generated tattoo will be is how clearly you can describe what you want. Five minutes of thinking before you open the app saves an hour of regenerations later.
Before you start, jot down quick answers to these:
- Subject — What's the central image? (a wolf, a flower, an abstract shape, a memorial portrait)
- Meaning — Why this image? Even a vague answer helps you choose between literal and symbolic interpretations.
- Mood — Should it feel bold, delicate, ominous, peaceful?
- Placement — Where on your body? This shapes shape and proportion.
- Size — Coin-sized, palm-sized, full panel?
You don't need final answers. Even loose ones make every later step easier.
Step 2: Pick the Right Style for Your Idea
Style is what separates "an image of a rose" from "a tattoo of a rose." A rose drawn in fine line looks dramatically different from the same rose drawn in traditional Americana, blackwork, watercolor, or Japanese irezumi style.
If you're not sure which style fits, an AI tattoo generator is the perfect tool to find out — generate the same subject in five different styles and compare. But here's a quick guide to start with:
- Fine line / minimalist — Delicate, subtle, often single-needle. Best for small designs and discreet placements.
- Traditional / Americana — Bold black outlines, limited color palette. Ages spectacularly well.
- Blackwork — Heavy black saturation with negative space. Striking and graphic.
- Japanese / Irezumi — Flowing imagery (dragons, koi, waves), strong color, full-panel work.
- Realism / portraiture — Photo-like detail. Best for memorial pieces and portraits.
- Watercolor — Soft color washes. Beautiful but tends to fade faster than other styles.
- Geometric — Clean lines, sacred geometry, sharp angles. Modern and architectural.
Browse our tattoo styles gallery if you want to see live examples of each.
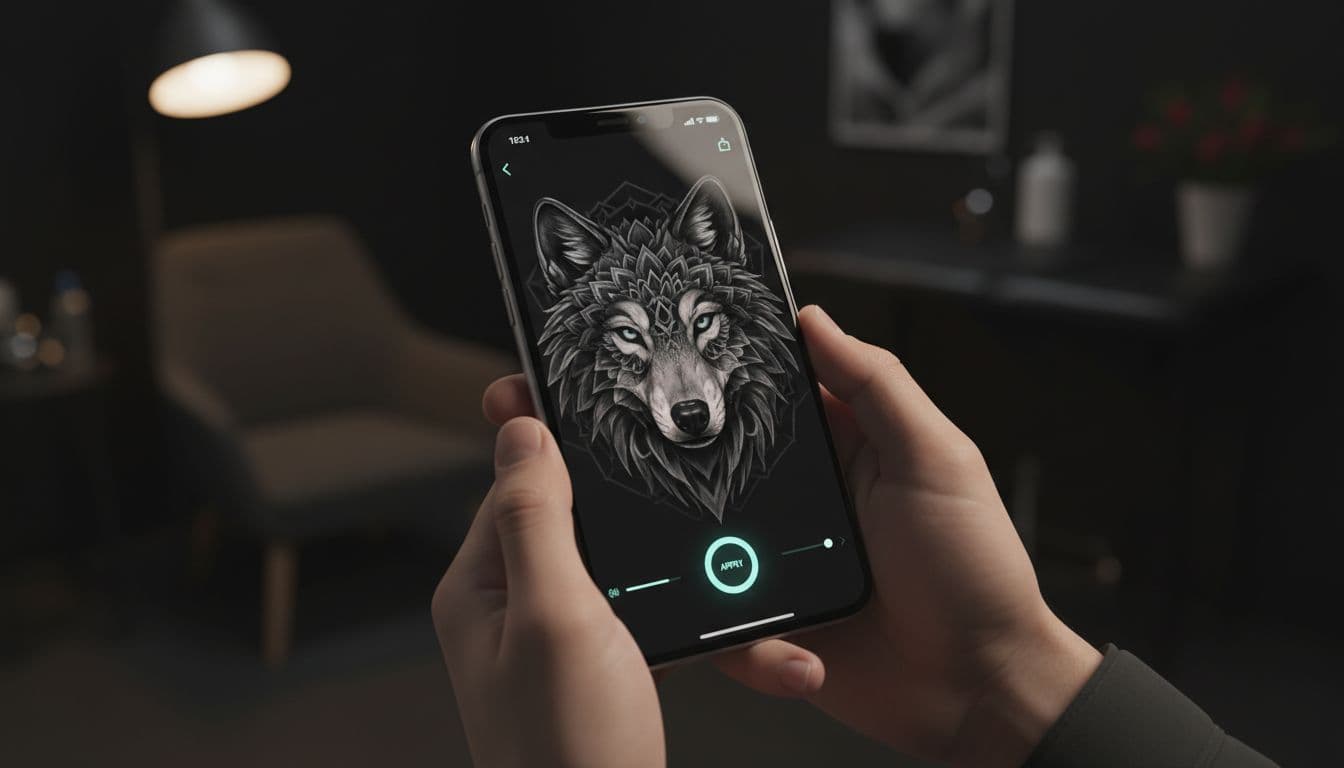
Step 3: Write Your First Prompt (Specifics That Actually Work)
This is where most people accidentally limit themselves. A vague prompt produces a vague tattoo. A specific prompt produces something usable.
Look at the difference:
Bad: "Wolf tattoo"
Better: "Realistic wolf head facing forward, blackwork style with geometric mandala behind it, designed for upper arm placement, bold contrast, 6 inches tall"
The good prompt tells the AI: subject, perspective, style, secondary elements, placement, contrast, and size. Each detail gives the model another anchor to lock onto.
A reliable formula:
[Subject] in [style] with [details], for [placement], [size descriptor], [tone/mood]
Examples that consistently produce strong results:
- "Single line botanical drawing of an olive branch, fine line minimalist style, designed for inner forearm, small (3 inches), elegant and feminine"
- "Neo-traditional tiger head with cherry blossoms, bold colors, heavy outlines, designed for shoulder cap, medium size, fierce and ornamental"
- "Geometric mountain range with sun rays, blackwork with negative space, designed for ribcage, vertical orientation, calm and contemplative"
Step 4: Generate Multiple Variations
Don't fall in love with the first result. Even great prompts produce hits and misses. Generate at least 4–6 variations of the same prompt before you start judging.
What to look for as you compare:
- Composition — Does the design fit the placement well, or does it look awkward in body shape?
- Detail density — Is the linework readable at the size you actually want?
- Style consistency — Does the AI hold the style throughout, or does it mix elements weirdly?
- Anatomy — For portraits, animals, or human figures, check faces and joints carefully.
- Negative space — Good tattoos have intentional empty areas. Cluttered designs rarely age well.
Pick your top 2–3 favorites. Don't try to refine all of them — focus your energy.

Step 5: Refine and Iterate
This is where AI tattoo design gets really powerful. Take your favorite generation and refine it through follow-up prompts. Most modern AI tattoo generators let you say things like "keep the composition but make it more minimal" or "same design but in fine line style" or "bolder outlines, less detail in the background."
Useful iteration prompts:
- "Same concept but cleaner — fewer fine details"
- "Same composition, switch to blackwork style"
- "Make the [element] larger and more central"
- "Add more negative space around the main subject"
- "Same design but designed for [different body placement]"
Iterate 3–5 times. Each pass should get you closer to the final version. If you're not getting closer after 5 rounds, go back to the prompt and rewrite from scratch — sometimes that's faster than micro-tweaking.
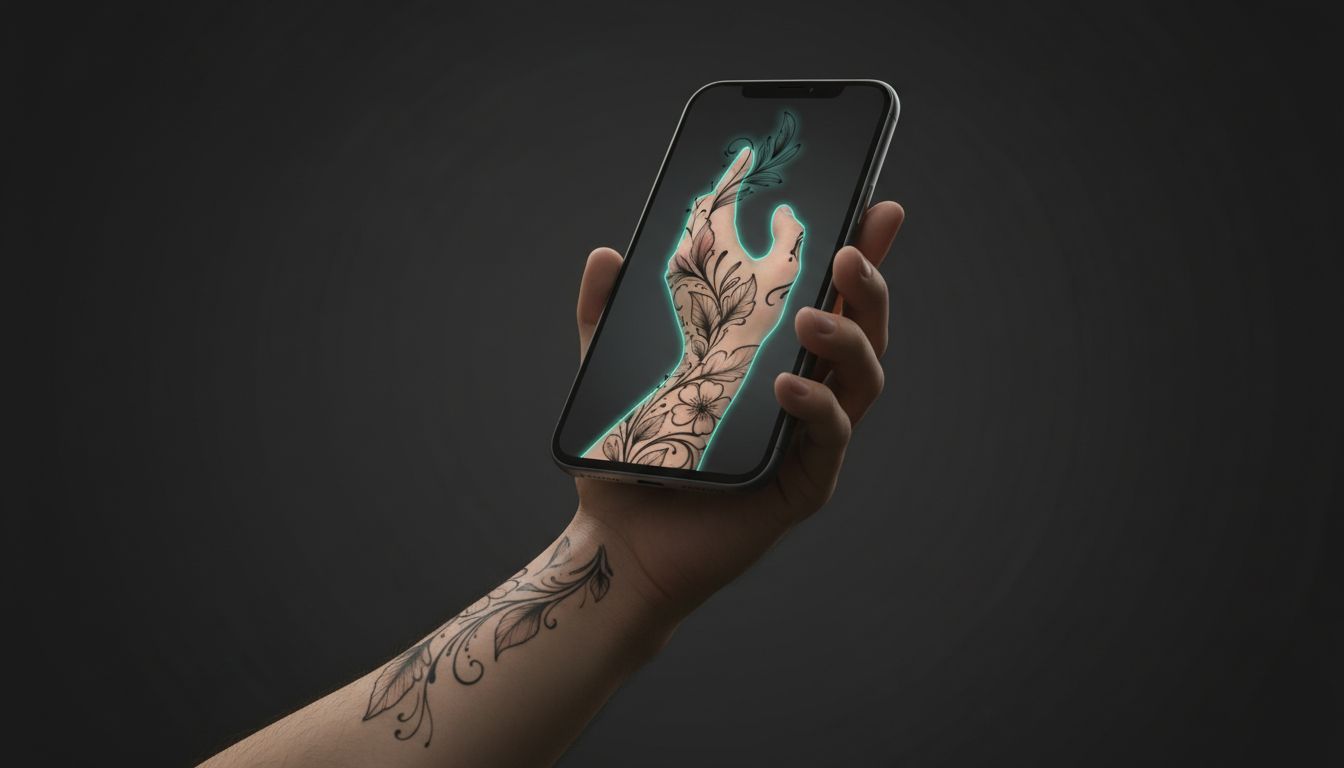
Step 6: Try It On Your Body with AR
This is the step that makes or breaks AI tattoo design. A design that looks amazing in isolation can look completely wrong on your actual body. AR try-on (available in INK and other modern tools) lets you place the generated design on a photo of yourself or in real-time camera view.
What to look for during the try-on:
- Scale — Is it the right size for the placement? Most people initially want a tattoo bigger than they actually do.
- Body flow — Does it follow your muscle and bone structure naturally, or does it look stuck on?
- Visibility from different angles — Walk around. Sit down. Move your arm.
- How it interacts with existing tattoos — Does it complement them or compete?
This is also when you discover that your beautiful 8-inch chest piece would actually be perfect at 5 inches on your shoulder instead. Trust the AR — it's brutally honest in a way mirrors aren't.
Step 7: Sit With It for Two Weeks
This is the most important step and the one most people skip. Once you have a design you love, do not book the appointment that night. Save the design and look at it every day for two weeks.
The reason: tattoo regret almost always comes from impulse decisions. The two-week rule filters out the ideas that felt amazing for a day and forgettable a week later. If you still love the design after 14 days of daily checking — including bad mornings, hangovers, and stressful workdays — you've cleared the impulse threshold.
Use this time to also generate a few side-by-side variations and revisit them. Sometimes the design you "loved" gets quietly upstaged by version four that you didn't pick at first.
Step 8: Bring It to a Tattoo Artist (As a Reference, Not a Final)
Here's the part that surprises some people: even the best AI-generated tattoo isn't a finished tattoo. It's a strong reference. Your artist will adapt it to the realities of your body, ink behavior, line weight that actually holds up over years, and their own creative interpretation.
How to use AI designs at the consultation:
- Bring 3–4 AI-generated reference images, not 30
- Be clear about which elements are essential and which are flexible
- Ask for the artist's input — they often spot improvements you missed
- Trust their adjustments for line weight, ink density, and placement subtleties
Artists generally love clients who come prepared with thoughtful AI references. It saves them hours of consultation time and gets you to the chair faster with a stronger design. Our first tattoo guide covers more on the consultation process.
Step 9: Save Every Iteration You Loved
Even if you only get one tattoo from this round, save the variations you generated along the way. Many people end up with whole "collection plans" — a sleeve concept, a back piece for next year, an idea they want to explore later. Your iteration history is a personal design library.
Inside the INK app you can organize designs into projects so each future tattoo idea has its own folder of references and variations.
Step 10: Use AI Again After Your Session
AI tattoo generators aren't only useful before the session. After you've healed (give it the full 4–6 weeks per our aftercare guide), use AI to:
- Visualize how the new piece will look alongside future planned tattoos
- Plan extensions or fill-ins around the existing design
- Test cover-up concepts if anything didn't heal the way you hoped
The same workflow that designed the original works just as well for everything that comes next.
Common Mistakes to Avoid
A few patterns that consistently produce bad results:
- Vague prompts. "Cool dragon" is not a prompt. The more specific you are, the better the AI performs.
- Picking the first result. The best version is almost never the first. Generate plenty before judging.
- Skipping AR try-on. A great-looking design that's wrong for your body is a bad tattoo waiting to happen.
- Skipping the two-week wait. The single biggest cause of regret is impulse booking.
- Treating the AI design as final art. Your artist's adaptation is part of the magic — don't insist on pixel-perfect reproduction.
- Over-detailed designs. Tiny intricate elements often blow out or blur within a few years. Bold and clear ages best.
For more on how ink behaves over time and what designs hold up, see our guide to what tattoo ink is made of.
Bringing It All Together
Used well, an AI tattoo generator turns a process that used to take weeks of consultations and sketch revisions into something you can do in a single evening — without sacrificing quality. The artist in front of you still does the irreplaceable physical work. But you walk into their studio with a clearer brief, a tested design, and far less uncertainty than the average client.
The whole 10-step workflow becomes second nature after one or two tattoos. By your third, you'll be designing pieces in 15 minutes that would have required four meetings the old way.
And the magic is that this isn't an exotic new tool anymore — it's just how thoughtful tattoo design happens in 2026.
Try the Workflow Now
Open INK and run through these 10 steps with your own idea. Free to start, no signup required to generate your first designs.
Launch INK Free →Create Your Perfect Tattoo Design
Use AI to generate unique tattoo designs and preview them on your body before committing to ink.
Start Designing for FreeWritten by
INK Team